This years boys biking trip was a bit of a departure from the usual red sandstone and desert of the South West – instead, we planned to ride the 330 miles from Pittsburgh, PA to Washington, DC on the GAP (Great Allegheny Passage) and the C&O (Chesapeake and Ohio) Canal towpath.
The 150 mile Great Allegheny Passage follows a railway corridor through wooded hills and small towns, reaching the Eastern Continental Divide before descending into Maryland. After Cumberland, Maryland, the route shifts onto the C&O Canal Towpath, traveling 184 miles along the Potomac River through peaceful forests and rural countryside all the way to Georgetown. Interactive map here.
Logistics
We drove gear and bikes to DC on the Friday and organized a shuttle to Pittsburgh on the Saturday – breaking up the trip over a couple of days avoided spending 10+ hours driving. We were able to leave a vehicle and post-ride gear at a friends house in the DC suburbs which helped tremendously.
We planned for 5 days of riding and here’s the day-by-day account:
As we were staying in rental house, B&Bs with washing machines and dryers and eating our meals out, we were able to pack pretty lightly. I packed about 13lbs of gear:
2 days of cycling gear (with layers for different temperatures)
3 days of non-cycling gear
spares and tools divided amongst the 5 of us
snacks, toiletries, first aid kit
Instead of traditional paniers, I opted for a smaller saddlebag and bar bags, specifically :
Revelate Designs – Spinelock 10L saddle bag on the back for stuff I’d only need at the end of the day (clothses. toiletries, charging cables, etc)
Revelate Designs – Harness and Saltyroll on the front for stuff I may need during the day (tools, spares, warm clothes)
Revelate Designs – Mag Tank – for tool kit, snacks.
Outer Shell – Stem Caddy – for quick access to rain jacket, headphones, cellphone
I used everything in my packs except a down vest that was good for additional padding so not a complete waste.
The other 4 riders in my party opted for traditional racks and Ortlieb waterproof panniers and I’d say 70% of other riders we met did the same. My reason for choosing bar and saddle bags we’re, in no particular order:
keep the weight down
lack of mounting options on my Checkpoint
ability to use the same bags on my mountain bike
Bike is a pretty standard Gen 2.0 Trek Checkpoint SLR 6 AXS, with an ISM 2.0 saddle and a Garmin Edge 1050.
I’ve been a happy, occasional WordPress user since 2008 – this blog is hosted by Automattic – I pay them money even though there are cheaper ways to host a low-volume WP site. I’ve even had the pleasure of meeting Matt Mullenweg a couple of times over the years. I’ve seen WordPress the product and community grow to the point where it’s become the de-facto content management system for the modern web – powering 478 million site – 43% of the web.
The WordPress community has recently been thrust into the spotlight due to a public disagreement between the two major players: Automattic, led by WordPress co-founder Matt Mullenweg, and WP Engine, a popular WordPress hosting provider.
At the heart of the dispute are questions about contributions to the WordPress ecosystem, trademark usage, and the balance between commercial interests and open-source principles. Automattic has raised concerns about WP Engine’s level of contribution to WordPress development, while WP Engine maintains that its contributions are substantial and in line with industry norms.
The situation has escalated to legal actions, with both parties sending cease-and-desist letters and WP Engine filing a lawsuit against Automattic and Mullenweg. This conflict has led to technical disruptions, internal restructuring at Automattic (Matt offered employees a decent severance package to leave if they disagreed with his position), and broader discussions about governance in the WordPress community.
As the dispute unfolds, it highlights the complex relationships within open-source ecosystems, where commercial entities both benefit from and contribute to shared resources. The outcome of this situation may have far-reaching implications for how open-source projects, particularly WordPress, navigate the balance between community collaboration and commercial interests in the future.
For the record – I don’t like open source freeloading – especially when it’s large well funded organizations doing the exploitation. Open Source collaboration depends on a certain degree of fairness – contributors take out more than they put in and it’s a fine balance that’s easily disrupted should someone decide to not give at all.
That said – I think Matt Mullenweg / Automattic could and should have handled this much better. If you are the dominant force in a community (as Automattic is in the WordPress community) and can’t defend yourself from freeloaders – you are doing something very wrong. If you control the code – there are thousands of tweaks you can make to the release model, cadence, APIs, to advantage you and disadvantage others. We lived this every day at Red Hat – it can be done without cease and desist notices, laying off employees who disagree with you and fracturing the community.
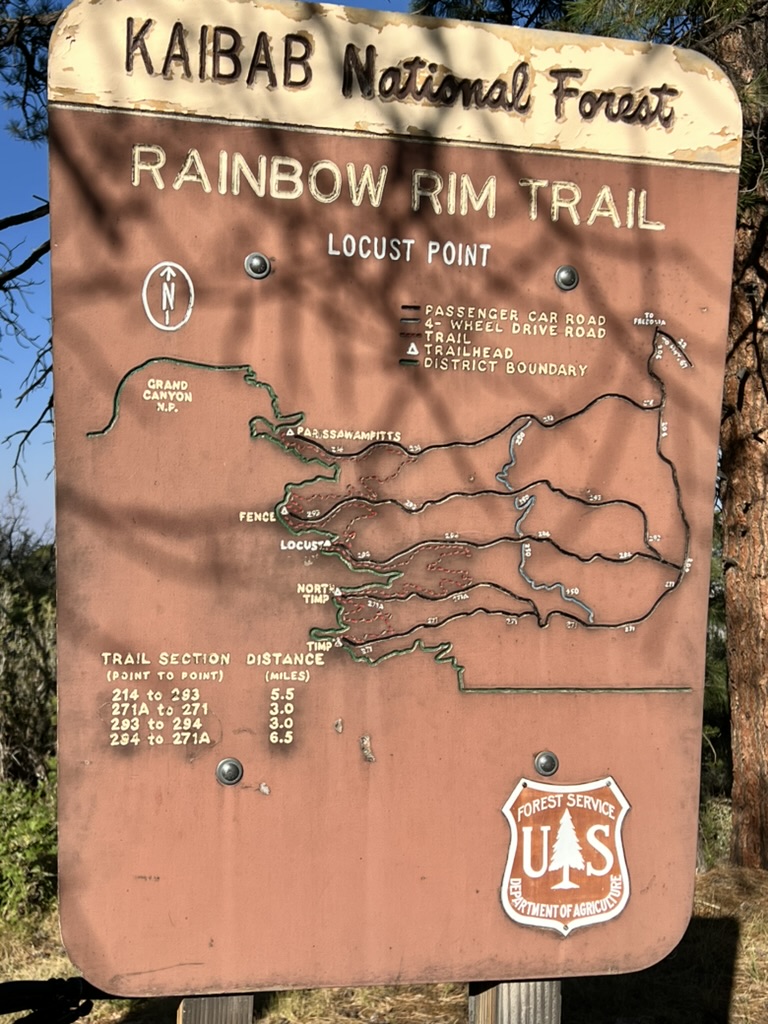
The next two days we rode the Rainbow Rim Trail which 18 miles of trail and a mix of forest single track and cliff side trail with stunning views. There’s quite a lot of up and down which if you’re not used to the elevation makes it feel harder than it is – but it’s all easily rideable with good lungs and legs.
Friday’s ride was 20 mile loop from our camp at Locust Point, south to Timp Point on the rainbow rim trail and returning on Forest trails. There are plenty of places to stop for a breather and take in the awesome views. Strava Activity
Post dinner entertainments was provided by the sunset, campfire, and some evening star-gazing.
Day 7 – Rainbow Rim north to Parissawampitts Point
On Saturday we packed up our gear, had breakfast and the rode the northern section of the rainbow rim trail to Parissawampitts Point and then back via the same route. There was a bit more climbing and for some reason I found this the hardest day. Strava Activity
Back at the (now decamped) camp – we scarfed down some lunch, racked the bikes and started the journey back to civilization. Iain, Bryan and I all had red-eye flights that night and were hoping to get back to Salt Lake City with enough time to get dinner and a much needed shower in the Centurion Lounge at the airport.
All in all – this was a pretty awesome trip – we jammed a lot into our 3 acclimation days and the North Rim didn’t disappoint – great riding and incredible views. If you are interested in this kind of multi-day bike trip – I’d highly recommend RimTours – this is my 4th trip with them and I suspect I have more in the future.
After another good breakfast at Cafe Feellove in St George, we headed over to the Red Lion Hotel to meet our fellow riders, and our RimTours guides – Beth, Birdie, and Lauren. After meeting the crew we loaded our gear onto the trailer and headed to our start point 2 hours away on the Kaibab Plateau.
We stopped briefly at the Jacob Lake Visitor Center to pick up three more riders and drop our rental car. then another short drive to pick up the Arizona trail once we got our bikes setup.
The first day was pretty light (just 14 miles) but had a couple of short technical climbs. All the riding was between 8500ft and 8800ft and this was my first exposure to strenuous exercise at a decent elevation. Our guides warned us to take it easy on the first climb – I really had no choice – it felt like I was breathing through a mask ! After a quick lunch stop and more bike adjustments, on to our campsite for the night at the East Rim Overlook. Note – campsites here are basic – usually just a sign telling you where you can and can’t camp. No pit toilets, no water, no shelter, no network. You have to bring everything you need with you – or in our case pay RimTours to do it !
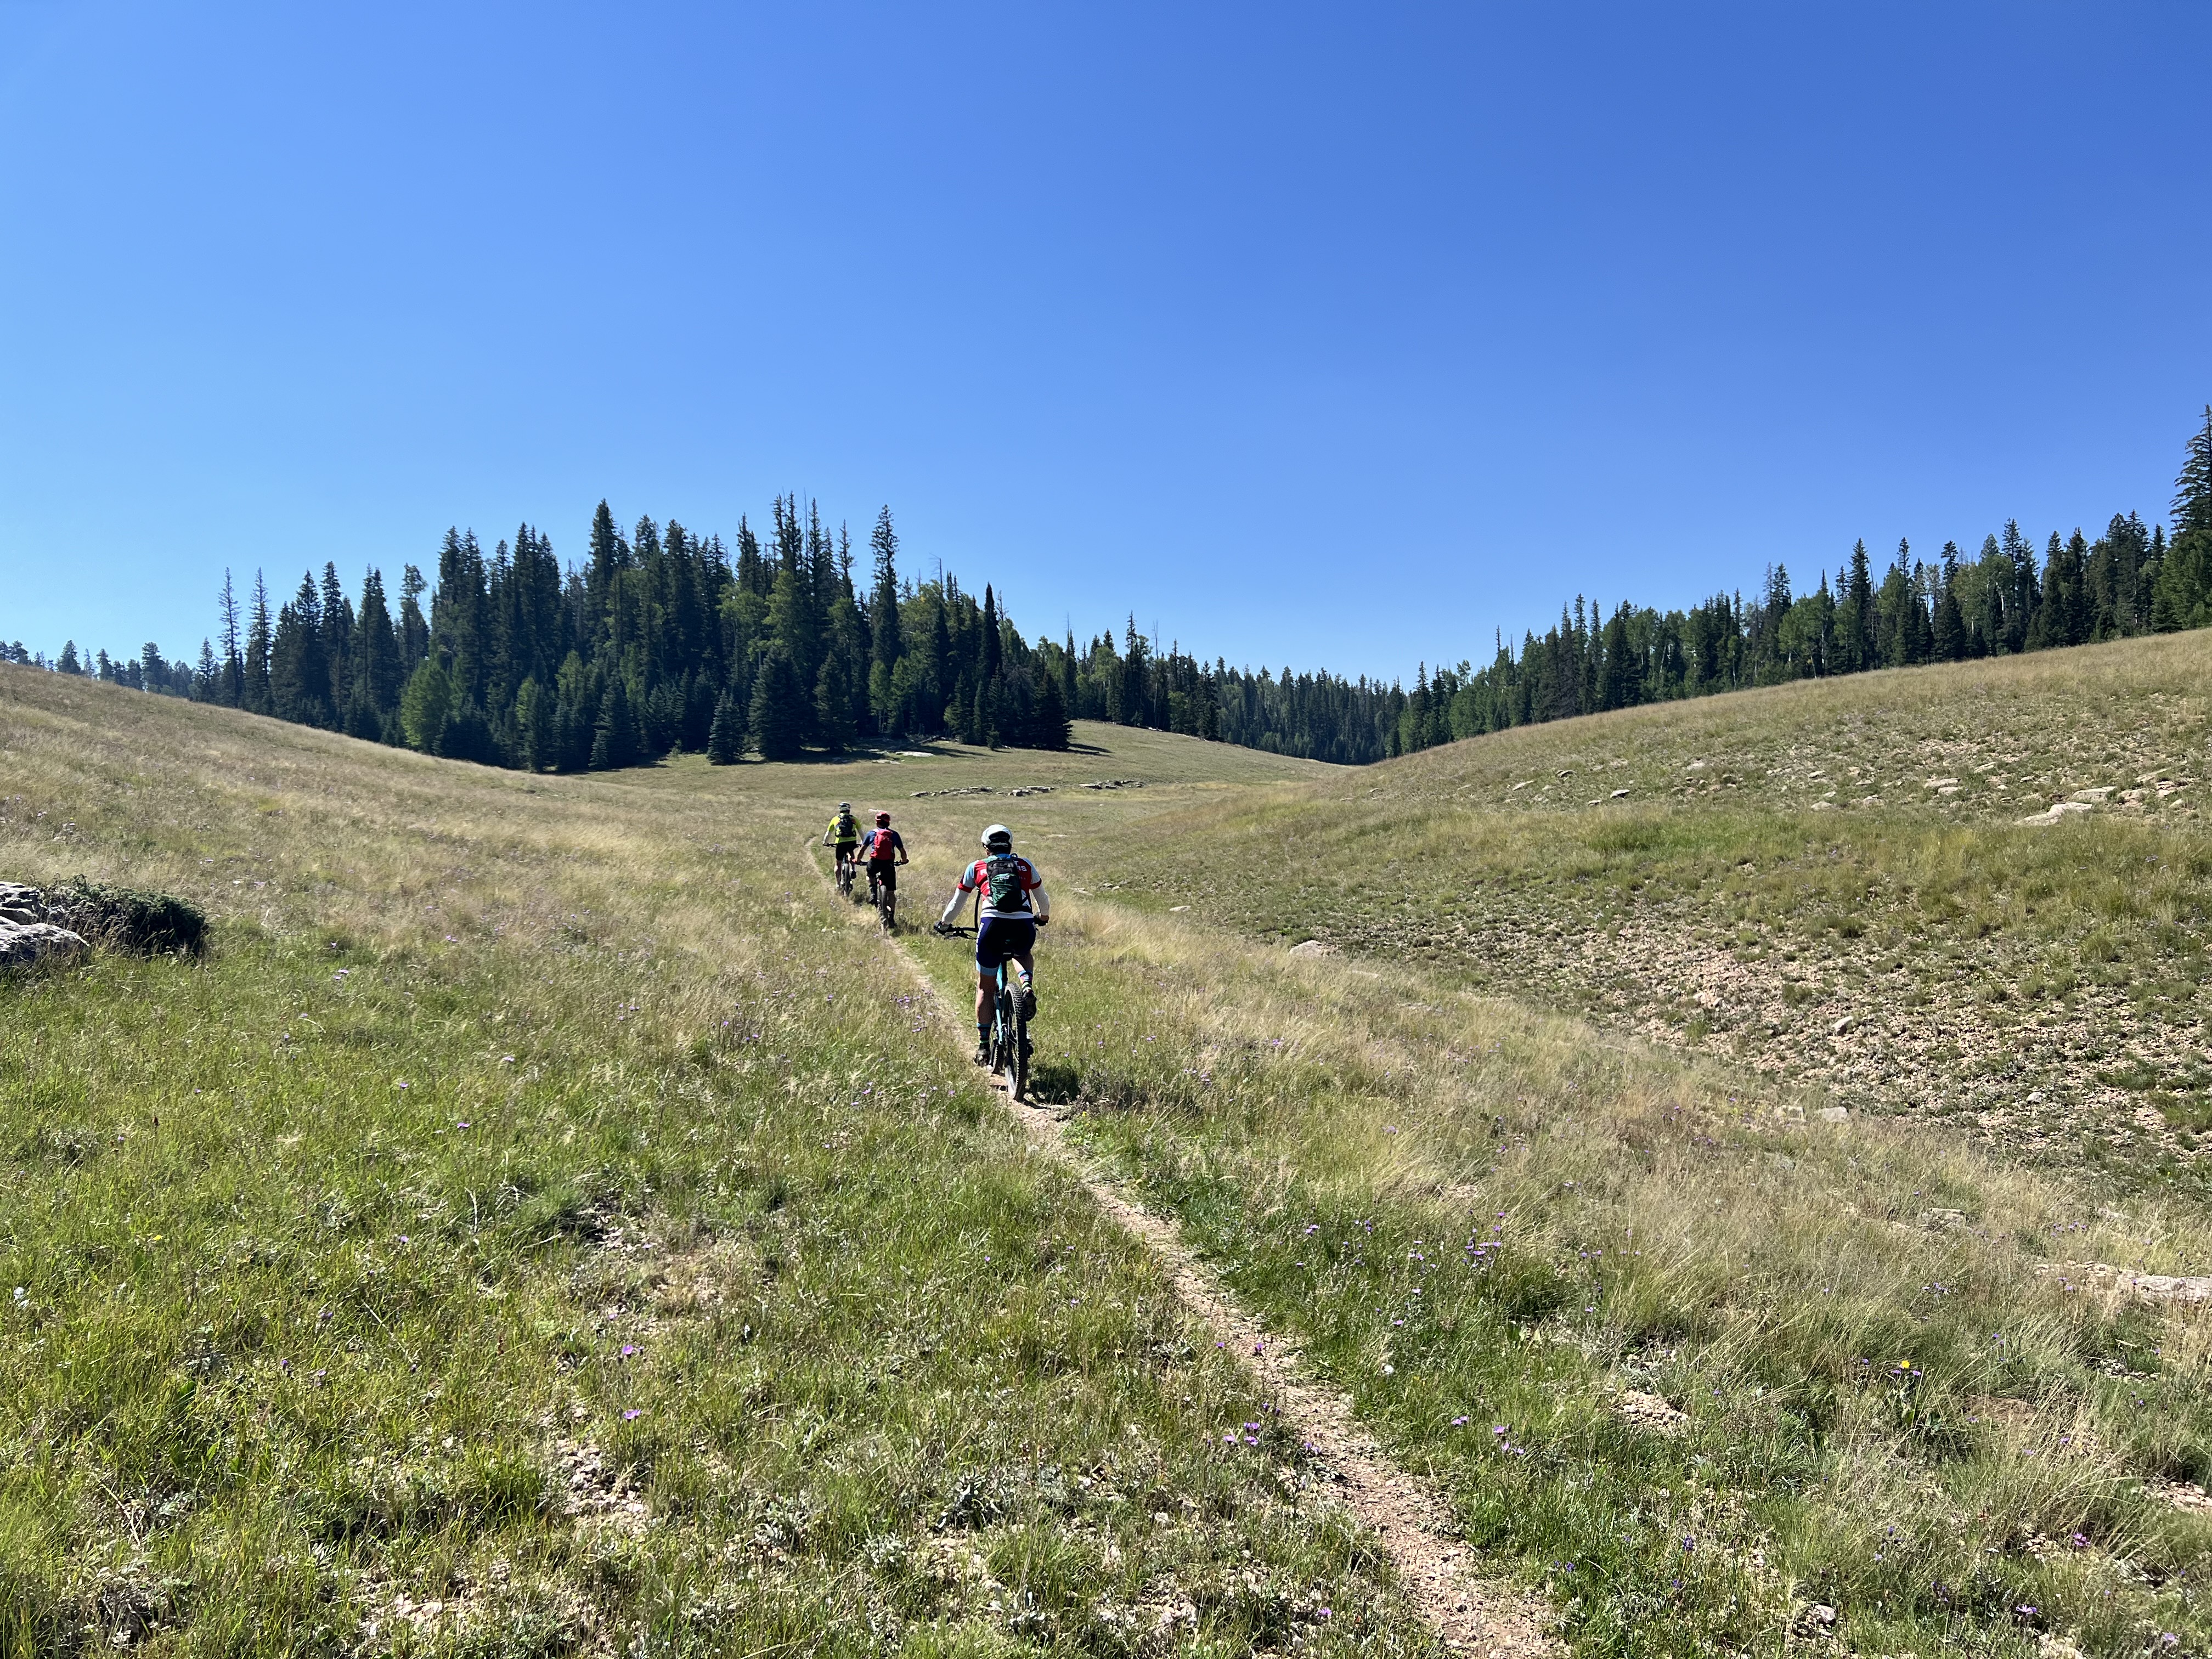
Still on East Coast time, I was up early enough for the sunrise yoga / stretching overlooking the Colorado river. The 4th picture below is the site of our “Groover” which seems to find the most scenic viewing spots one these trips. After breakfast and decamping – we jumped back on the Arizona Trail. We had a much longer ride (32 miles) – some single track, some high-prairie, and some forest service roads. We peaked around 9000ft but ended the day at Locust Point campsite around 7600ft. Fortunately for my lungs – not much climbing but it was a long day of riding and once we had setup camp and eaten another awesome dinner prepared by our guides – it was time to grab a beer and watch the sunsetting.
This year’s south west mountain bike trip started with a few days acclimating to the heat and altitude in St George, Utah. We picked up rental bikes pretty much as soon as we got into town after the 2 hour drive from Vegas. We rented the bikes and a 4 bike rack from Red Rock Bikes in nearby Hurricane – great shop with friendly staff who helped us get everything set up. We had a longer ride planned for the next day but after a day of travel were keen to get out and ride despite the 100F+ temperatures. After a bit of driving around we found the trail head parking for the Zen Trail – a fairly short, climby, technical trail just outside St George. The trail isn’t well marked and the whole area is covered in trails and not surprisingly we went off course a little and after all the climbing I managed to split my tire and couldn’t fix it on the trail so had to waste the wonderful downhill section. Strava activity.
Day 2 – Wire Mesa
On Monday (Memorial day) we met up with David and headed to Wire Mesa – it’s a smaller, less exposed version of the better know Gooseberry Mesa and in the same general area. Getting to the parking lot is a bit of an adventure but well worth it – I could ride this kind of trail every day of the week – technical enough that you have to pay attention and choose your line, but completely rideable. The views of Zion and surrounding area were stunning – photos just don’t do it justice. We dropped the bikes back to Red Rock in Hurricane and hit River Rock Roasters for lunch. Strava Activity
Day 3 – The Narrows, Zion
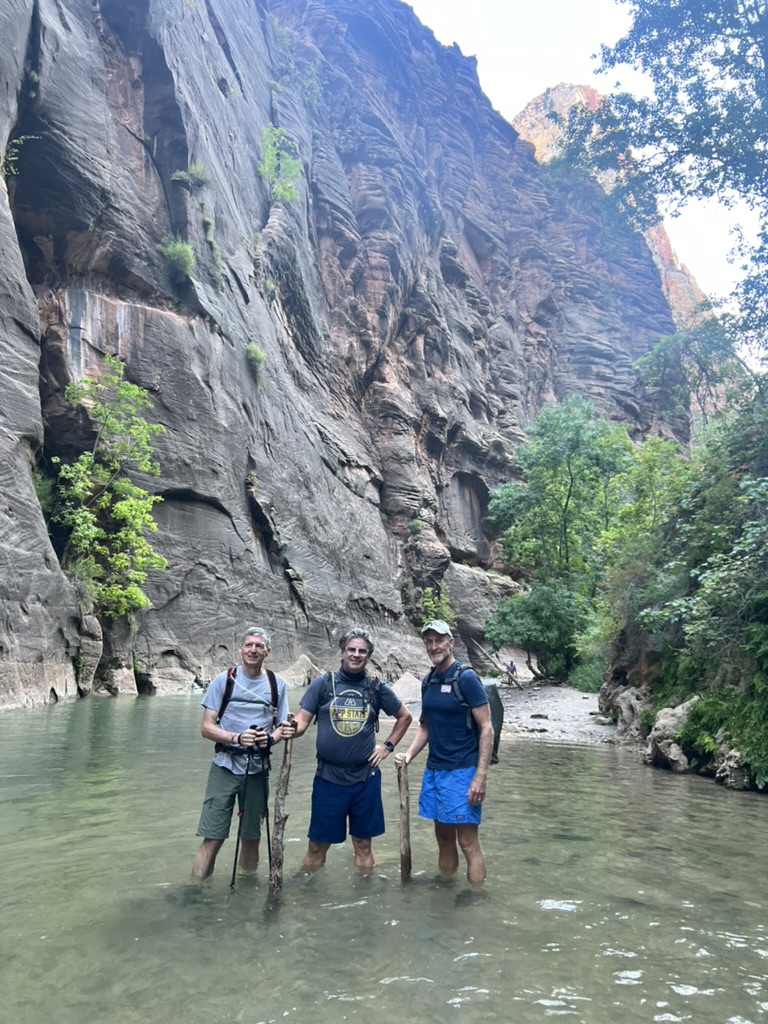
It was a toss up between hiking Angels Landing and The Narrows and The Narrows won. We got to the already fairly full main parking lot about 7am and jumped on the 45 minute shuttle to the start of the river trail (Temple of Sinawava). We’d already unwittingly made our first mistake in our rush to get on the shuttle – we didn’t rent hiking staffs – only Iain had hiking poles, Brian and I had to make do with whatever improvised walking poles we could find on the river bank. Unless you’re an aquatic mountain goat – I wouldn’t recommend hiking the narrows without a staff or hiking poles.
We didn’t quite get to “Big Springs” (the end of the trail) due to high water and strong currents – we’d already swam / waded chest deep in some sections and it was becoming cold and tiring. We did explore the smaller “Orderville Canyon” on the way up – a beautiful side canyon with fewer people and no wading. In all we hiked just over 12 miles in 5.5 hours. For hike that is pretty much flat – it was pretty strenuous and difficult underfoot – I’m still surprised my weak ankles and knees held out.
Note – you can see the sections where we had to swim on Strava as it sent the Altimeter on my Apple Watch haywire.
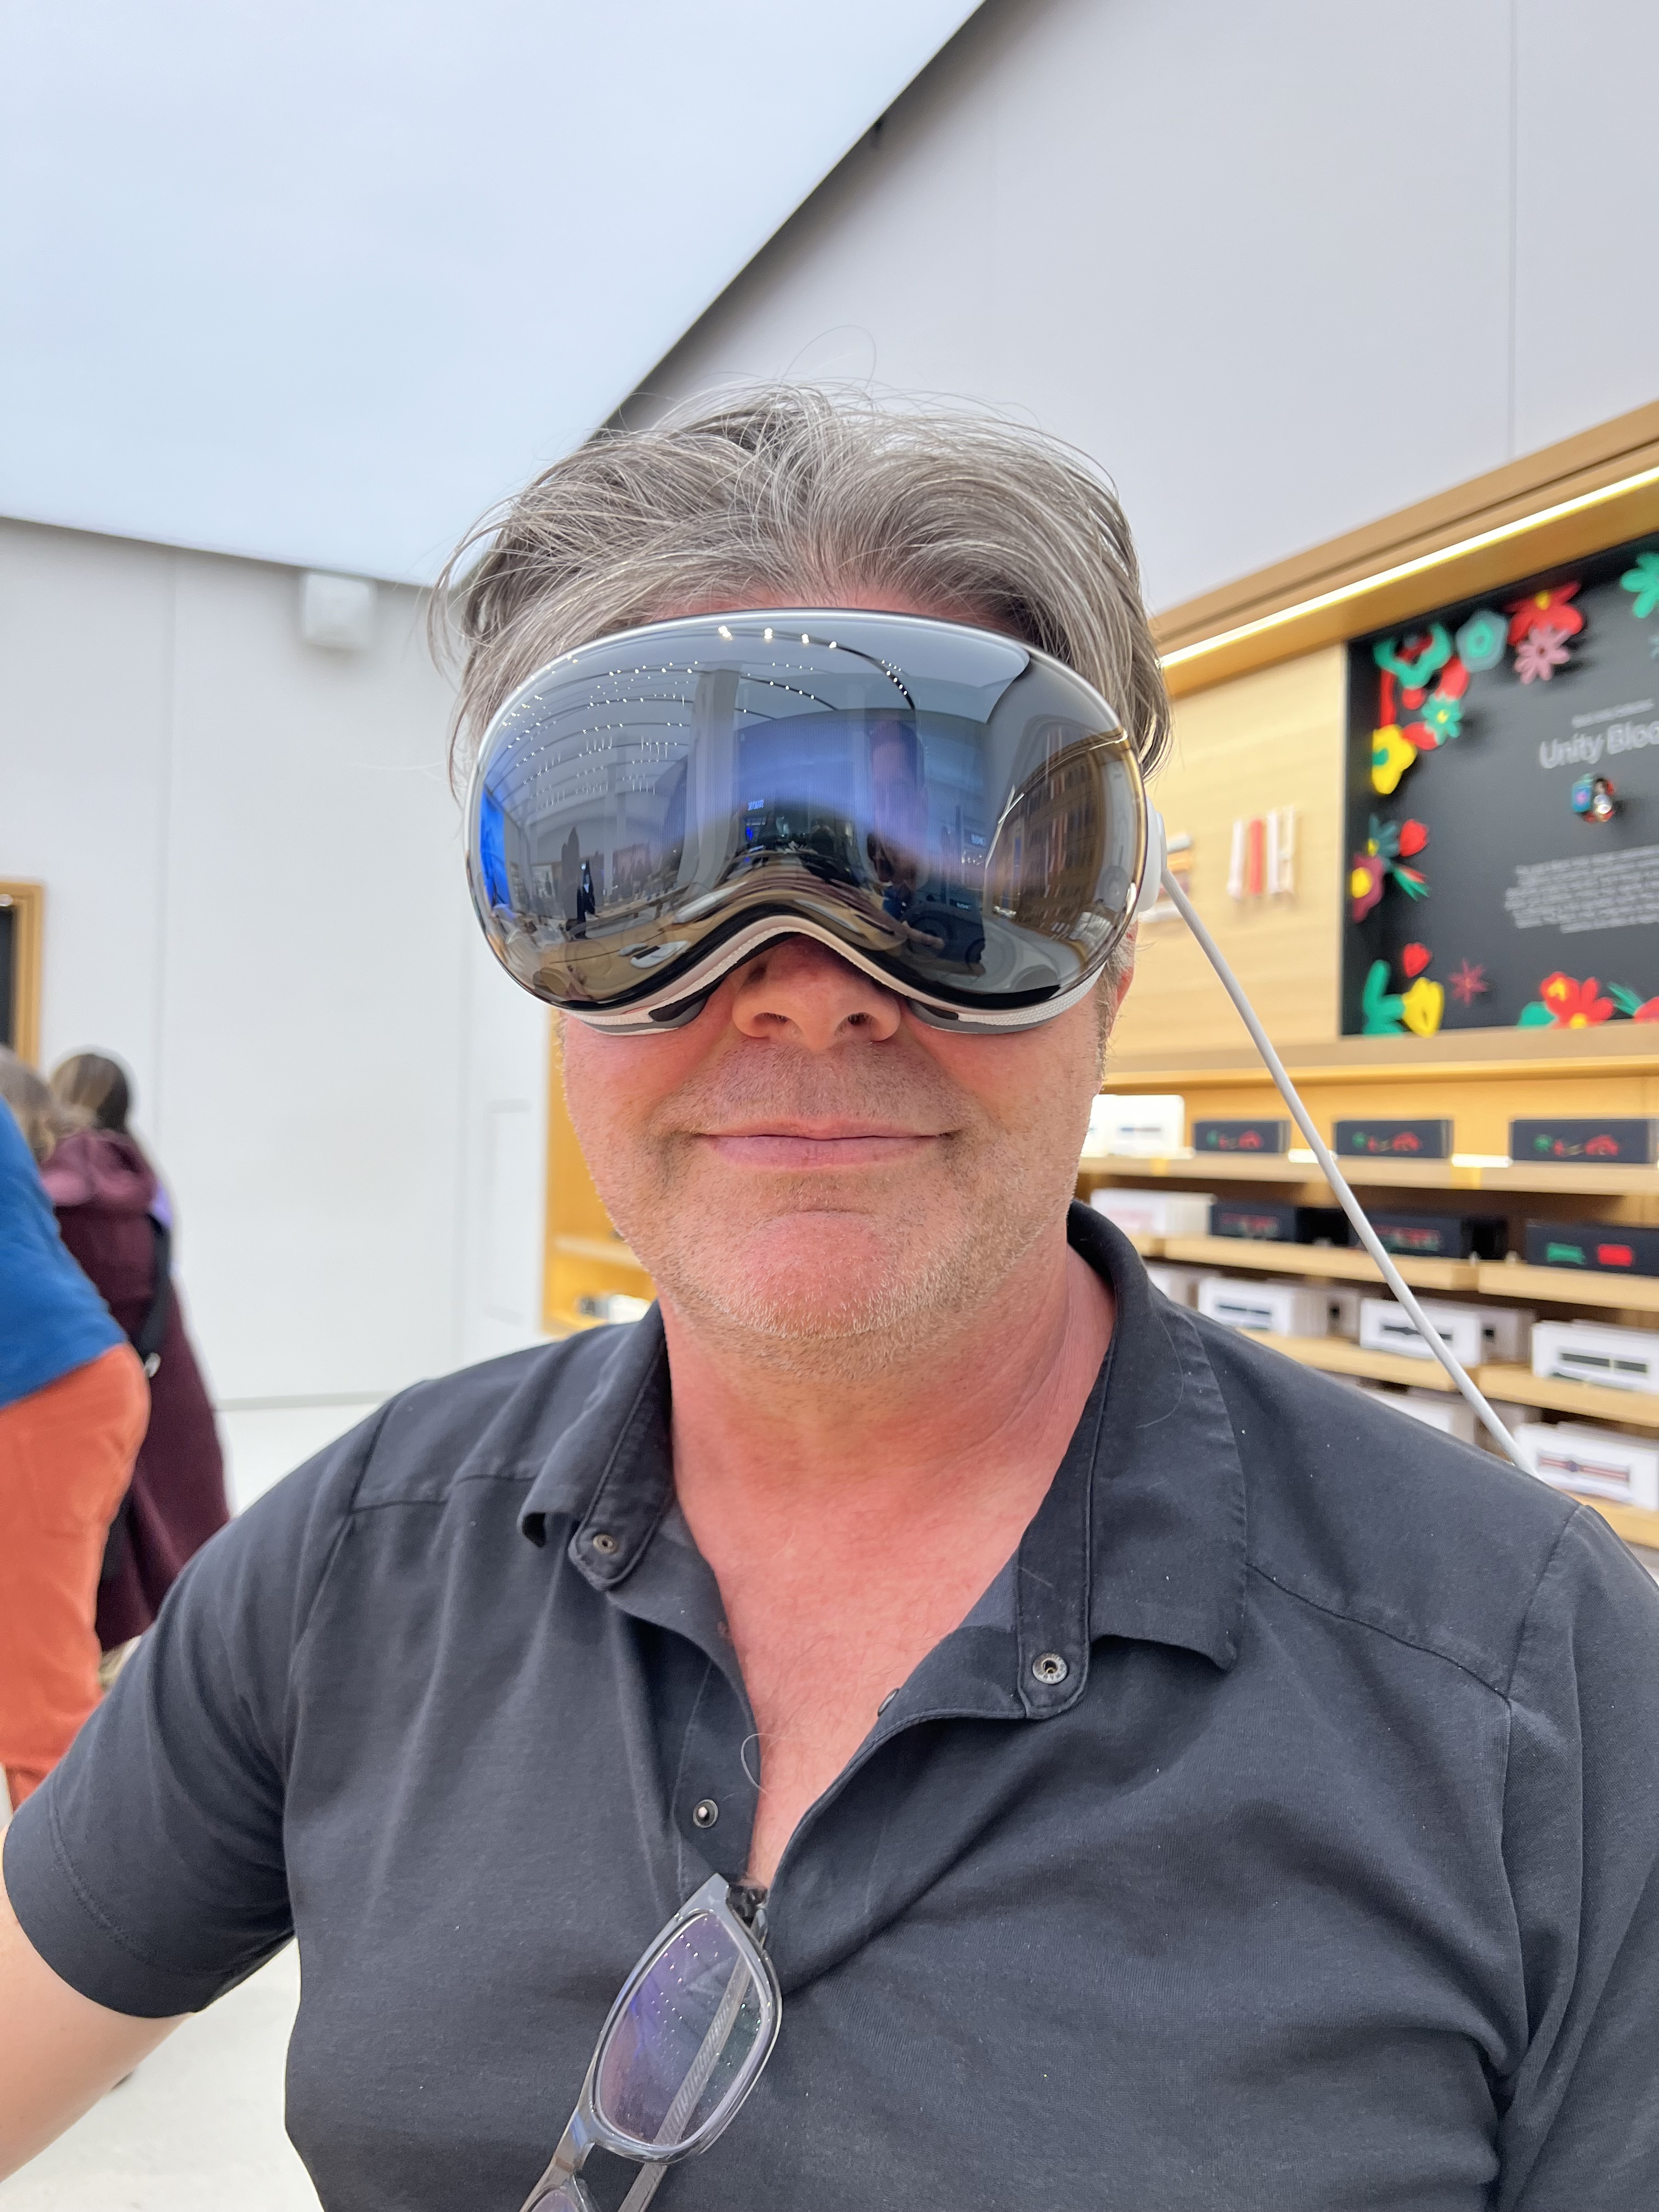
If you know anything about me, you know the two things that test my resistance are bike shops and the Apple stores. So, over the weekend, I found myself in the local Apple store and chatted with the guy serving me. The discussion led to the Vision Pro. With a bit of time on my hands, I agreed to a quick 15-minute demo.
I wear progressive lenses with a pretty complex prescription, so the first potential hurdle was getting the optical inserts set up and whether they would even support my prescription. Apple has an in-store machine that will measure your existing eyewear, so you don’t need to have your prescription details. That worked incredibly quickly, and the store will even mail you the settings for later use.
The headset is quite a bit smaller and lighter than I expected – I have owned the last few iterations of the Meta headset, and they’re much bigger. The device feels well-engineered, and the materials feel the quality you’d expect on a $3500 device.
I only had a quick 15-minute scripted demo, so I didn’t have much time for free play, but here are the things that really jumped out at me.
Ergonomics – It may help that I’m a long-time Apple user, but the user interface felt incredibly natural – after just the briefest of explanations, I could open, close, move, resize windows, zoom, and scroll. This in itself is incredible for a couple of reasons:
There are no hand controllers – you just use your eyes to select things on the screen and your fingers to perform operations
The accuracy is pretty impressive, considering what is going on here.
With one exception – you have to use the watch-like bezel on the headset for specific operations – there has to be a good reason for this departure from the hand gesture UI – I just can’t think what it is.
Video and audio quality – the regular UI is really nice – if you’re used to having one or more big curved monitors on your desk – you will be at home. Where things get really amazing is the 3-D immersive video. The demo movies were on par with a recent trip to the Sphere in Las Vegas – parts of your brain really are tricked into thinking that you are there, inside the movie. There were a couple of demos of sports games. I think this could be an opportunity for Apple – for the real sports aficionado – the sticker price probably won’t be a significant obstacle – I just don’t know how many broadcasts take advantage of the technology today – if the EPL gets on board. I will have to take a second look! Watching regular TV and movies – I’m less certain about that – those things are relatively social activities and I can’t imagine households buying multiple headsets.
For me, the question remains—would I buy it, and more importantly, would I use it? The short answers are —no, I didn’t buy one, and no, I don’t think I would use it. I can say this with some certainty as I bought the last couple of iterations of the Meta headsets and stopped using them after about a month.
The longer answer is less certain. I’d love a more extended session with a keyboard and mouse pad and determine if it could be used for work. My current office setup is nice, and the cost easily exceeds the price of a Vision Pro. The problem with the work use cases is that Apple really caters to creative workers – designers and developers – both need decent power on their desktops. The Pro is M2 powered but specced like a mid-range laptop – if you are doing builds, video encoding, etc., that probably isn’t going to be enough given the horsepower needed to deliver the Pro UX. So you’re likely going to have your regular laptop/desktop and use the Vision as the display – that is currently supported, but I didn’t play with that feature – I think that could be pretty neat. I have a few Apple (and other) machines in my office and use virtual displays regularly.
I think AR/VR’s time will come as the technology evolves and the use cases and killer applications become more apparent. What we see with the first version of Vision Pro and Meta’s latest offering are incremental steps in a revolution in human/computer interaction. I’m looking forward to a longer demo and to see what version 2.0 looks like.
In the fast-paced world of product development, and with limited resources and time, prioritizing what your development teams should be working on is one of the most demanding challenges Product Managers face.
As product leaders, it’s essential to understand the Pareto Principle to separate and prioritize the “Vital Few” features or RFEs from the “Trivial Many.” Every product leader likes to think they have good instincts regarding which feature to build next, yet most products ship features that are rarely used or never used. As a practical aside – there’s only one thing worse than a product or feature with no users, and that’s a product or feature with a single user or small number of users. You still have to carry the cost of the feature for the long term but get little value out of it.
Deciding which features to prioritize requires a framework to remove some subjectivity and stress from the decision-making, allowing you to move swiftly and confidently.
This blog post equips you with the knowledge and tools to navigate the prioritization process effectively.
Why Prioritize?
“Good fortune is what happens when opportunity meets with planning.”
– Thomas Edison.
You can’t plan without prioritization, and without a plan, your product is much more likely to fail. Good prioritization allows you to:
Focus on what matters most: Align features with your product vision and business goals. By identifying the “vital few” features, you can prioritize development efforts on what truly matters, leading to a more valuable and impactful product.
Deliver value faster: Get the most impactful features to users quickly. Identifying and focusing on the core features allows you to launch your product quicker, capturing market share and user feedback earlier.
Optimize resource allocation: Ensure your teams work on the right things at the right time. Limited resources can be directed towards developing the most impactful features, maximizing the return on investment.
Simplify the User Experience: A product with fewer, well-designed features is easier to learn and use, leading to higher user satisfaction.
Simplify the GTM. A product, even an MVP, with a clear purpose, value proposition, and a focus around a distinct set of use cases is much easier to position and sell.
Alignment
Ultimately, we all want to deliver the highest value features to the end user as quickly as possible. Unfortunately, while the goal sounds simple – the reality is quite a bit more complex.
For starters, what does “highest value” mean – most used? Higher willingness to pay? Most likely to deliver better productivity or enhance quality? Better stickiness? You can only answer these questions if you have a well-articulated strategy and set goals or objectives for the offering. Alignment to objectives is part of the prioritization process.
Who are your users? Are they all treated equally? Do you need to segment by free or paid or by customer/account size?
Are there dependencies between features? Do you need to deliver feature X before feature Y has real value?
Frameworks for the Win
Several frameworks can guide your prioritization journey. I split them into two broad categories depending on where you are in your product journey.
The first are lightweight frameworks that don’t require a lot of customer/prospect data and can be used to prioritize pretty much anything. Use these frameworks for early MVPs where your market sense is still the most significant determining factor.
Value vs. Effort: Plot features on a matrix based on their perceived value and development effort. These charts are nothing more than a simple way to visualize the choices.
MoSCoW Method: Categorize features as MUST-have, SHOULD-have, COULD-have, and WON’T-have based on their importance and feasibility. MosCoW is the simplest model and doesn’t require a lot of data to drive – it’s nothing more than a way to capture your market sense/instinct.
The second category assumes you have more data to drive your decisions and are more appropriate to a more mature offering in a more mature organization. The quantitative approach vs. the objective approach will allow you to scale, take toil, and stress out of the process and also let you tune your prioritization based on other factors such as market segment, customer size, or other objective categorizations (UX, security, retention).
R(ICE): Score features based on Reach (Impact, Confidence, and Effort) to compare features or enhancements quantitatively. (more info)
Kano Model: Categorize features as Basic, Performance, and Excitement to understand user expectations and satisfaction levels. (more detail)
Beyond the Framework
Choosing the most appropriate framework is just the beginning. Remember these additional points:
Gather data: Conduct user research, analyze user feedback, and leverage analytics to understand user needs and pain points.
Align with stakeholders: Get buy-in from key stakeholders by involving them in the prioritization process.
Be flexible: Market dynamics and user needs can evolve, so be prepared to adapt your priorities.
Communicate effectively: Clearly explain your decisions to stakeholders and users to avoid confusion and manage expectations.
Document Assumptions: as you learn more or situations change, you can change assumptions and reprioritize.
Whichever method you choose to prioritize feature development – effort, feasibility, or some other proxy for cost must be part of the algorithm. Creating an unachievable roadmap will guarantee some adverse outcomes:
Missed deadlines, overruns, and slips which will erode trust with your stakeholders (sales, execs., investors, customers)
Burnout amongst your team- leading to lower efficiency, leading to more overruns, and lower quality
Poor quality – lots of shortcuts leading to rework, half-baked, half-assed features
You likely need more information to make accurate estimates at the planning stage. Still, some cost estimates are better than nothing, and estimation is a skill that only improves with practice. Use what tools and expertise you have – expert consensus, t-shirt sizing, bottom-up, analogous estimation.
Remember, prioritization is an ongoing process, not a one-time event. Regularly revisit your priorities, gather new information, and adjust as needed. By embracing a data-driven and collaborative approach, you can conquer the feature prioritization challenge and build products that truly resonate with your users.
My recommendation is that once you have decent data flowing regarding use cases and features, then it’s worth investing in PM-specific tooling (ProductBoard, Jira Align), which will give you a choice of prioritization, tunable weighting, and integration with data sources such as support systems, win-loss analysis, survey data, and user research.
It is essential to be transparent in all things related to planning and prioritization – you should be able to justify why feature X is a higher priority than feature Y. Your stakeholders and partners in engineering and marketing need to believe your roadmap is focused on the right things at the right time. Be honest about how decisions were made – ie. When you have solid data or when you are using intuition. Be honest and transparent about your confidence level – this is especially important for early-stage products or companies where intuition plays a more critical role than rigorous customer/usage data.
Curve Balls
Finally, expect an executive override, customer escalation, or some other high-priority request to land at your feet, requiring you to re-plan and reprioritize. Demanding strategic customers who need feature X before signing a renewal, your CxO prioritizes a feature due to a high-integrity customer commitment.
The reality is that you have to be able to deal with these requests – as a PM – you have to be able to quickly assess the cost, strategic alignment, feasibility, vs. the opportunity cost (what roadmap items you will need to sacrifice) – you can only do that if you have a robust framework for prioritization.
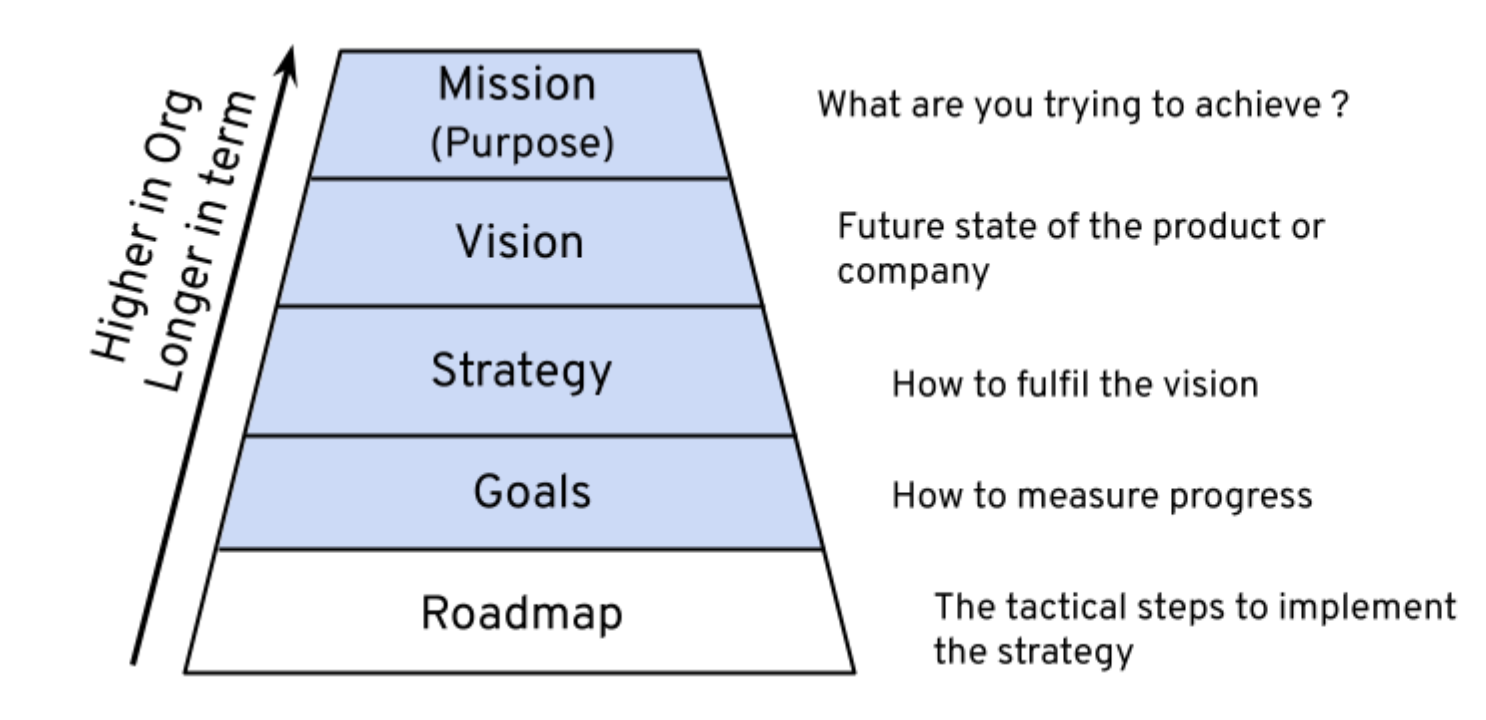
I covered Roadmaps in a previous post, but product roadmaps cannot be created in isolation. Roadmaps must support your company or organization’s strategic direction captured in its Mission and Vision. I’ll outline these essential concepts and explain how they are connected to form a strategic planning framework.
First, clarifying the terms Vision and Mission is necessary. I’m using the term Mission to mean “the organization or product’s reason for being.” Mission is often used synonymously with Purpose, which I will use interchangeably. Occasionally, Mission is sometimes used as a synonym for Vision, but I find this confusing and will avoid doing this.
I use the term Vision to mean the organization or product’s future state – i.e., where the strategy will take the organization or product.
Mission
Your organization’s Why” is its core purpose and reason for its existence. It defines the fundamental value your brand contributes to your customers and users, the market, or the world and the positive impact it strives for. Think of it as the North Star that guides your decisions.
Your Mission should be captured and shared as a clear Mission Statement. Your Mission statement must be ambitious but also practical and achievable. It should also be durable and relatively static – it’s not uncommon for successful companies to have the same Mission for the organization’s lifetime.
It’s not uncommon for organizations to have an undeveloped or unclear Why – If you’re interested in developing or improving your organization’s Why, you could do much worse than start with Simon Synek’s Why, How, and What.
Vision
Your Vision is your organization’s “where” or aspirational future state. It paints a vivid picture of the market landscape when everything goes according to plan, considering future trends, threats from your competition, and opportunities. It serves as the guiding light for long-term investments and innovation efforts. Vision is about the future. Vision is aspirational and typically has a 3-5 year horizon.
Strategy
Your strategy is the actionable plan to achieve the vision. It translates the broad aspirations of the vision into concrete steps, considering resource constraints, market realities, and technical feasibility. It should be adaptable and responsive to changing market conditions and emerging technologies. In a larger organization, you will likely have a refinement of the corporate vision specific to the business or product, but the connection should be clear.
I present the hierarchy like this to represent the organizational altitude because it’s much more natural in larger organizations with multiple business units or products. It also helps you to think of the duration of these terms. At the top of the pyramid is Mission or Purpose – this could and should not change significantly over several years, decades, or even the organization’s lifetime. Vision is more likely to have a 3-5 year horizon. Strategy and Goals are linked to annual planning, and the Roadmap gets down to specific months, quarters, and year halves.
Likewise, Mission, Vision, and Strategy are typically defined at the company level and cascade down to business units or products, which will refine Strategy and Objectives to focus on the elements they can deliver or support.
Goals
I’m a big fan of OKRs (Objectives and Key Results) as a way to define and manage the execution of strategic goals, and I have successfully used OKRs in large and small organizations. Well-written OKRs help your team or organization achieve focus, accountability, engagement, transparency, and visibility. If you’re unfamiliar with the ORK framework – there’s no better place to start than John Doerr’s 2018 Ted Talk. There are many other goal management frameworks, and the advice below is general enough for any method. The important thing is that strategy alone is not enough – execution of the strategy needs to be monitored and managed.
Objectives capture your strategic initiatives – i.e., what your business unit, team, or product must do to support the business strategy or higher-level Objectives. They need to be inspirational enough to motivate people but also attainable to some degree – i.e. successful attainment should be between 80 and 120%. Well-written objectives clarify what the organization should be working on. Objectives shouldn’t be used to track an organization’s ordinary/mundane operations – you should have other ways to track those things. OKRs are better for monitoring ambitious goals- i.e. to help you achieve extraordinary results.
“Without strategy, execution is aimless. Without execution, strategy is useless.”
― Morris Chang
Each objective must have one or more Key Results – how you measure progress and ensure you stay on track to meet your objectives. Each objective should have between 2 and 5 Key Results at a given organizational level.
OKRs should be part of your annual planning, with quarterly reviews and the potential to make changes at least biannually.
In larger organizations, OKRs cascade down the organization. Depending on the nature of your OKRs, you could define supporting objectives at each level in the organization or have objectives that apply to all levels and Key Results defined at different levels so the results contribute to the level above.
The Whole Picture
There is plenty of literature on crafting Vision Missions and strategy. I’m not going to go into any more detail in this post – but as a Product Manager – it’s essential to understand how the concepts are connected. More importantly – Visions, Strategy, Goals, and Roadmap must be clearly and unambiguously connected.
Summary
To summarize, the mission is about the present, the vision is about the future, the strategy is the plan to achieve the vision, and the goals are the objectives that capture your strategic initiatives. OKRs are a great way to define and manage the execution of these strategic goals.
A well-defined Mission, Vision, and Strategy with clearly aligned Objectives will ensure your organization has focus, clarity, and the inspiration to succeed.
We don’t need stinkin’ roadmaps! Yes, you do, except in some rare circumstances, which I’ll outline below.
For clarity – let’s define the term:
A product roadmap is a visual summary that maps out your offering’s features and capabilities over time and helps your customers and stakeholders understand your direction and progress toward fulfilling the product’s goals.
There are many reasons you need a product roadmap.
If for no other reason, you need a roadmap for your medium-term (e.g., quarterly) planning. In this case, your roadmap is nothing more than a wish list of features with some form of prioritization. If you don’t have this – you can’t plan.
Your engineers and other downstream collaborators need to be able to see further than the next 2 or 3 sprints. Knowing what’s over the short-term planning horizon will help them make more informed design decisions, optimize hiring and training, and support better resource allocation.
If you are a B2B product company – your salesforce needs a roadmap to understand how the product will close a competitive gap or when you will deliver a capability required by a particular customer segment. Your roadmap helps sales plan their engagements more efficiently and effectively.
Enterprise (B2B) customers need a roadmap – it helps them determine whether you are progressing toward your stated product vision, and it helps them plan upgrades, expansions, or migrations. More practically, it allows them to understand where you are vs the competition in addressing their needs.
Most B2B sales combine what you have in the product today and what your roadmap and vision tell the customer about where you are heading.
If you are in a larger company – your leadership needs to know that you are investing the company’s finite resources in the way that gives the best return and helps attain the company’s objectives.
If you are a startup, your investors/board will take an even keener interest in your investments – in many cases – it’s their money. Expect to defend your investments and the roadmap.
If your management or investors aren’t interested in your roadmap, you may have more significant problems. I’ve experienced this when revenue and growth are the only indicators of product success. Unfortunately, revenue and growth are trailing indicators – they only expose mistakes already made in the last quarter or year. Product roadmaps (and justification and prioritization behind them) can give organizations better insights before resources are committed and potentially wasted on the wrong things.
There are situations where you don’t need to share a roadmap beyond the immediate product team, and the roadmap is primarily a planning tool and a way to demonstrate progress to your management or investors.
If you’re releasing a barebones MVP to assess Product Market Fit – you don’t need a roadmap.
If you are a B2C product company – your customers don’t need to see a roadmap – have you ever seen a roadmap for your favorite smartphone or video game?
If you have a very stable product in a very stable market – your customers probably value stability over change – a roadmap is not going to be a priority and will be limited to ‘features’ that show customers that they can depend on your product to keep working the way it does (e.g., support for newer hardware or operating systems)
In short, if you’re a product company, your product roadmap is your product strategy manifest, how you plan to make the proper steps towards your goals. Everything on your roadmap should align with your goals in support of your vision and objectives.
If you think visually, this diagram may help tie vision, strategy, and roadmap together.
Who owns the Roadmap?
Product Management is ultimately responsible for maintaining the roadmap, but creating the roadmap is a collaborative effort. Your stakeholders in sales and marketing need to be aligned with your roadmap and understand the next level of detail behind the roadmap. Your stakeholders need to be sure that the roadmap is aligned with and fulfilling your vision and strategy – there needs to be a direct line between the roadmap and the strategy – if your stakeholders understand the strategy, then there should be no surprises on the roadmap because they will be fully aligned.
Tools
I generally prefer to present roadmaps from the tool I use to create roadmaps – ProductBoard is my current favorite, but tools like Monday, Ignition, Jira Product Discovery, etc., all allow you to manage and prioritize features, align with goals and strategic objectives and pull together an interactive and professional roadmap. There are a few occasions when you may need to pull a roadmap presentation into a slide deck (board meeting, strategic customers), but your PM planning tool should be your only source of truth for the roadmap. I find using a specific roadmap/planning tool gives you more credibility – everyone knows you can throw together a roadmap slide five minutes before the meeting – using the tool that drives your planning is a different level of commitment.
Scope, detail, and uncertainty
For a fast-moving product company in a fast-moving market – a 2-3 quarter roadmap is sufficient, and anything beyond that is highly speculative. I prefer to be very explicit about that – there’s a bucket of features over the planning horizon – these things are still worth sharing – your audience (internal or external) can help you prioritize those features. Different markets and products will have different dynamics – a roadmap for a mature product in a mature market will have a much more static roadmap, and planning could extend into 6-8 quarters for major features or releases. These are generalizations, obviously – even mature products will occasionally have to be agile and quickly plan and release new features at the expense of roadmap stability. Likewise – if you are in a fast-moving segment, you will still have strategic roadmap items – like significant architectural changes or re-platforming, where the work takes longer. Hence, you need a longer planning horizon and roadmap.
There will always be some uncertainty on a roadmap. The further out something is on the roadmap – the lower the certainty and detail. Beyond one year – my unplanned bucket is nothing more than curated feature ideas with little detail or commitment behind them. Conversely, in the near roadmap – this quarter, next quarter – many of these features should be committed, i.e., Planned – you likely have a level of detail that allows you to engage with design and engineering and may already have an execution plan (e.g. Start sprint and sizing/cost). You will have a lot more detail and may already share details such as wireframes and conceptual designs with customers and internal SMEs. My rule is that your next quarter’s roadmap should be 80-90% accurate, two to three quarters out – 50-60% accuracy, and beyond that 20-30% – ie. Largely speculation.
Finally – roadmaps are an honest attempt to share how you are executing against your stated strategy or vision. Still, the only thing certain about a roadmap is that nothing is certain about a roadmap. I always lead with the caveat that things can and will change, and many larger organizations I’ve worked with have legally-approved disclaimers on roadmaps to make it clear that they are not legally-binding commitments. Occasionally, there will be exceptions – some items on your roadmap are high-integrity obligations to customers, partners, and other internal dependent teams, but everything else can and will change depending on numerous internal and external factors – market dynamics, higher priorities, etc.
Themes and Objectives
In an ideal world – your product roadmap is your strategy manifest. It shows how you are delivering against your strategy and vision or short to medium-term progress towards your long-term goals. For any reasonably complex product or portfolio of products, your strategy will break down into themes or objectives, and your roadmap will align with those objectives.
Roadmap Mistakes
Don’t be unrealistically specific about dates. The most accurate roadmap is the one with no dates at all – just “now,” “next,” and “later”. If you can’t get away with that (e.g., B2B), calendar quarters or halves for further out. Plans constantly change, and estimates are optimistic, so don’t delude yourself.
If your roadmap doesn’t reflect or support your strategy or vision, then people will be inclined to think that your strategy isn’t real or you’re failing to deliver on your vision.
If you have multiple versions of your roadmap in slide decks and documents dotted around your company intranet, they will all be out of date at some point. This will lead to confusion and busy work. You must have a single source of truth to which everyone has (at least read-only) access.
List of disconnected features. Your roadmap is your strategy manifest, so if it’s just a scattershot of features with no apparent structure, what does that say about your strategy? Thematic roadmaps are critical for portfolio companies – the themes help your colleagues in marketing get behind a small set of impactful messages.
Conclusion
Except in some rare cases – your product needs a roadmap. Your roadmap is a tactical enforcement of your vision and strategy, and there must be obvious alignment. Organizing your roadmap under broader objectives or themes will help enforce the alignment. Product roadmaps are dynamic documents and should be reviewed constantly, and the dynamic nature of your roadmap should be clearly communicated. Given the dynamic nature – ensure there is a generally accessible single source of truth for your roadmap.
Defining and launching a product successfully without making at least some changes during the product development lifecycle is rare. Or, more likely – product leaders who are willing and able to adapt their product plans as they gather feedback during product definition and execution are more likely to succeed.
Product Market Fit (PMF) is used to assess whether an offering has found its place in the market (i.e., solves real problems users have) and can support a sustainable business.
PMF isn’t just a one-time check – it is something you must do continuously, even after you have shipped a product and have seen some success. User needs rarely stay static, and successful products and companies see the signals of change and adapt.
The Stages of Product Market Fit
The sooner you can determine good PMF, the sooner you will have the confidence to invest and build. Unfortunately, the PMF signals start weak and strengthen only as you get closer to a released product.
Once you have made an initial product available to customers (Prototype, MVP, Beta), your signal strength increases significantly, but so does your cost and resistance to change.
Generally speaking, there are things you can and must do before you build the product and things you should do once you have shipped something to continuously monitor whether you are still relevant to the market.
Market Validation and Sizing
The first step is to validate that there is a market for the solution you are thinking of. If you’re doing something truly disruptive and creating a new market – this will involve talking with people you believe have the problem you are trying to solve – you are trying to validate a concept. You will also need to size this market to understand the potential or TAM (Total Addressable Market) to determine if there’s a real business in solving the problem.
If you are not a true market-maker (more common), it will be much easier to determine the market potential – you may have established competitors, open source projects, or industry consensus that will validate the market need and potential size.
Pre-product
Once you understand the market and the personas involved (users, buyers, influencers), you can start to validate whether your proposed solution and its USP (Unique Selling Points) will address the market need. That validation will likely consist of one or more of the following with increasing fidelity:
User/customer feedback on concepts
Testing the USP and Value Proposition with users/customers
Formal testing with wireframes, early prototypes, etc.
Canned demos to start explaining some of the behavior to users
Pre-GA releases – the sooner you can get the working product (in some state) into the end users’ hands – the better.
The challenge at this stage is finding the right users/personas willing to commit time and provide feedback – incentives (service credits, free access to the final product, etc) may help.
During this stage, you will likely learn more about your target users and may even have to re-consider your target personas in light of what you learn. The feedback you receive may also require you to change how you talk about the product and may need to refine and refocus your USPs.
Post-product
As I mentioned at the top of the article – the PMF signals get stronger the closer you get to a released product, and until the user can try the product in-context you may still need some critical validation. There are many factors aside from the core product that can affect user acceptance and validation:
Price – you may have validated PMF in the context of a free offering. Putting a price on something changes how the user thinks about the product.
Form – you may have validated the offering as a standalone feature (vs embedded as part of a platform) or a software vs service or dedicated hardware device.
Availability – your procurement and onboarding process may add additional friction unacceptable to your target user/buyer.
Market Access – you may have engaged with some initial target users, but does your salesforce/ sales channel give you access to the market you need?
Just because you have shipped a product and found at least some success validating PMF – don’t stop listening to the market and your customers/users. This is where tools like NPS or The 40% rule (aka Ellis Test) can be helpful to ensure your offering and the market aren’t diverging over time.
Who is responsible for assessing PMF?
Determining PMF is a team sport. It likely starts with and is spearheaded by Product Management and Product Marketing during discovery and development but will ultimately require support from User Research, Sales, Customer Success, and other groups in the organization.
Ongoing assessment of market fit will come through your Customer Sucess or Growth teams as they constantly monitor the performance of the product (NPS, Rule of 40%) and ultimately, your sales, sales-ops, and finance team looking at signals such as ARR growth, LTV (Lifetime Value) to CAC (Customer Acquisition Cost) ratio. Note – revenue or revenue-based derivatives may be good measures of PMF but it happens way too late in the product lifecycle to be use exclusively.
Conclusion
Shipping any product or even substantial features without validation during discovery and development is highly risky and will likely result in expsnive and disruptive pivots.
The PMF signals strengthen as you get closer to a released product, but you should still start as early as possible with customer/user sessions around concepts, ideas, and USPs because the costs of changing your focus and product plans increase substantially once you have released something to the market.